Thursday, October 24, 2013

Glass notes - making little squares

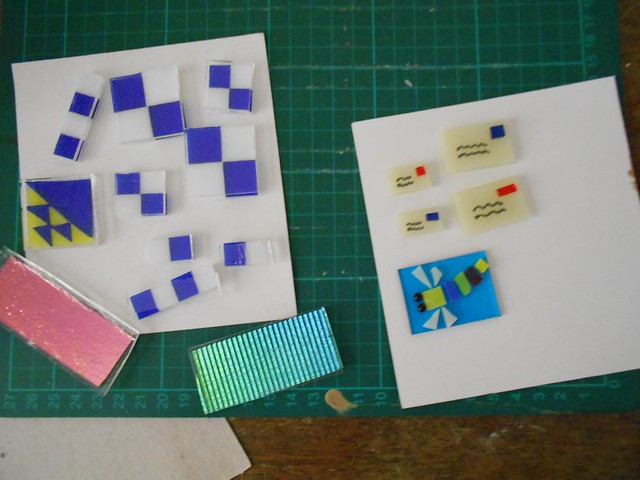
I spent quite a while making the squares I needed for the block I had chosen from my design book. I needed some distraction so I found a couple of cute animals to make.

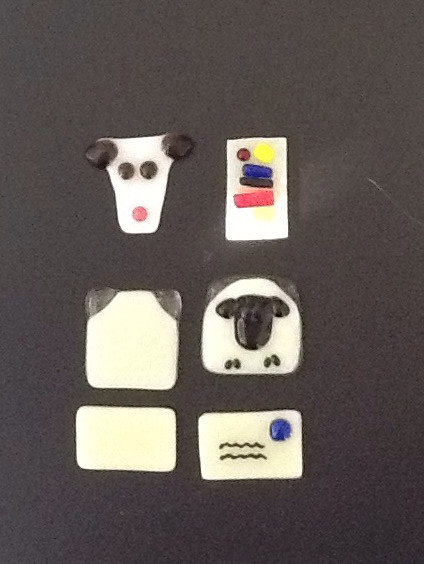
The first is a cat face. I will paint the face on with black glass paint. The second is a bird. I will put little block dots on the eyes with glass paint. I have tried something similar with a dog face. With just one background layer of glass they are quite thin but will probably make good buttons or brooches to put in the Glass Applique shop. I plan to try to put some dangly legs on the bird. Will have to see how that goes. I will fire these two on a soft fuse. Maybe 760 for 5 mins. I am still deciding. I may go a bit hotter but I don't want them to shrink in too much.

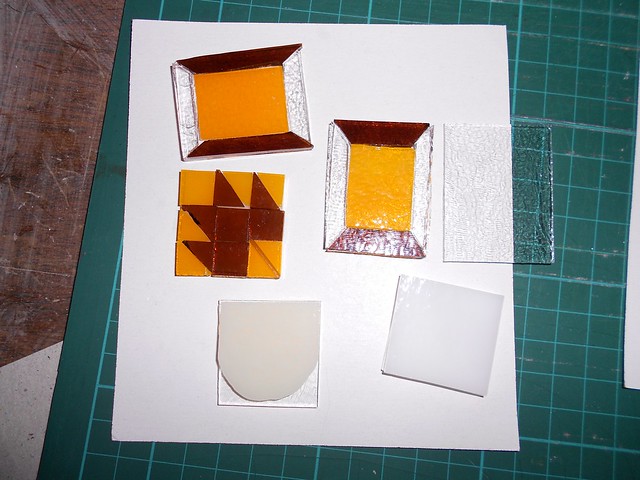
The blocks I made are made up of 16 little squares. Since 3cm square is a good size I cut off a 3cm x 1.5 cm piece first,

then I cut that in half,
then I cut each little square into 4 smaller squares.


I am still struggling with colours. I have always had to work on getting my quilt colours right. It is just the same with the glass but even harder because they can change when they are fired.


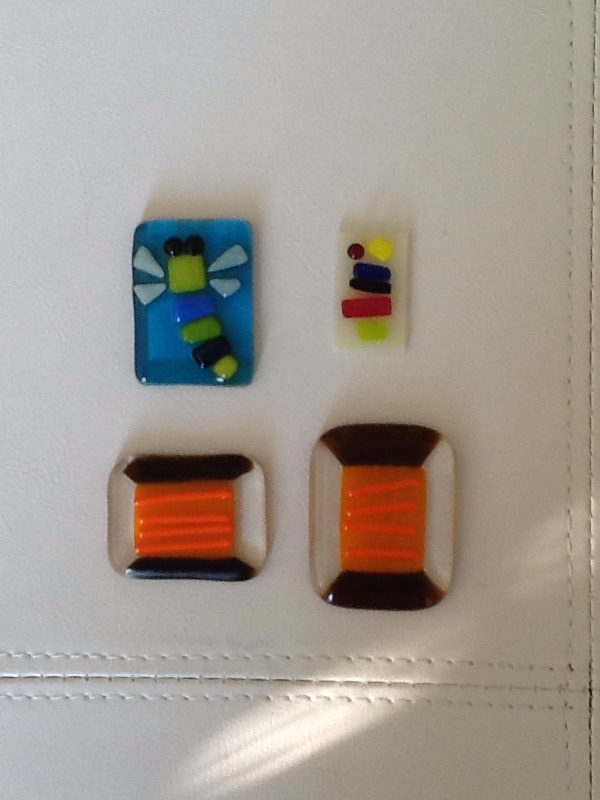
This is what I settled on. I still have to wipe each piece and glue them to a background layer.


These two I will do on a full fuse 804 for 5 mins. I usually do 10 mins soak but I don't want the corners to round too much.

If you like reading this blog you should register to receive it by email.

Cheers,
Val

Thursday, October 17, 2013

Product Update - Little Letters and a Pineapple

I have made a pair of little letter earrings, a pin brooch and a pendant or charm.  The pale colour is close to the real look. It is called almond.


My partner is so good at cutting out the silhouettes. Every time he makes one I just want to have it. His latest is the pineapple. What a beauty!


Follow the blog to see new and matching items. The post title will start with 'Product Update'

Cheers,
Val

Thursday, October 10, 2013

I love making things that match

I needed to do another trial with my almost full fuse. I made a cute wallet that needed a button and zipper pull so I tried to match up the colours in the fabric using the glass that I had. Even though the striker pink seems to match the red colour in the wallet I had a couple of other buttons with that pink and it didn't quite match. The only colours that came close were the yellow and orange. I so want to buy some more colours.

I am making up sample pieces for each colour.

I do love the way the yellow and orange look when fused. They are both opalescent and I put them on plain clear.


I clean each piece and lay it on a cardboard tray.
The glue the pieces to the base with Hotline warm glass adhesive.
I let it dry overnight.
I also had the urge to make a pendant and earrings to go with my new singlet top so I used my favourite blue and the striker pink, both transparent. I put them on a white base.


I will finish them off and wear them to the Brisbane craft and quilt show next week.

The firing schedule I used was one I used before but I think maybe it is not quite hot enough. I am trying to get as square a finish as possible for my quilt block items. Maybe I will just have to embrace the soft edge look. 780 and hold for 10 mins was not enough to make the layers meld together at the edges so it spoils the line of the pendant on the clear backing. The one on the white backing seemed fine.

Summary

  • Bullseye yellow O 0220 and orange O 0025 look great together
  • Bulleye blue T 1116 and striker pink T 1215 need yellow or green to set them off.
  • 780 hold for 10 mins fuses three layers with white base
  • 780 10 min hold doesn't fuse layers so well with plain clear base

Friday, August 30, 2013

Notes on soft fuse

The left hand items were all done on a soft fuse program that slowly ramped up to 780 and held for 10 mins.

I like the way the background square has squarer corners than the one I did on full fuse. The elements on the top right piece were soft fused at 768 for 5 mins. They are a bit too rounded so I am going to try 760 for 5 mins. Somewhere between 750 and 768 there must be a point where the glass softens. I will find it.

The blue and yellow block and the red pinwheel were formed on a full fuse. The blue and white block and the green pinwheel look pretty much the same done on the high soft fuse. The whites look different because they are different whites. The whiter one we can't get any more from our Canberra supplier.


The dog is done at 768 for 5 mins. So were the sheep elements and the letter with the stamp. I want all the elements to be a bit less rounded so similar items go in at 760 for 5 mins next time.

The finished sheep has a background made of a curved layer of white on a square layer of clear and fully fused. The one on the left I put clear triangles in the top corners and used a piece of white that I just cut the corners off. The clear triangles look like ears :(

The blank envelope I did on 780 for 10 mins. It gives a nice finish to the two layers. I will add the elements ( writing and stamp) and form at 760 for 5 mins. The one all done at 768 is pretty good though. I will try the complete envelope at 760. It is better to only have one step maybe.

A comparison between 768 and 750 with the dragon fly and the piece next to it. I want something in between these two.

The Cotten reel on the left is two layers on full fuse first. The reel on the right is three layers full fused first. Not much difference but the two layer brown is a bit darker. The stringers were done at 768 for 5 mins.

My next experiment will be similar items on the 780 fuse or the 760 fuse using nice whole numbers for the ramp rate and hold temps. I can't see the point of ramping at a rate of 139. Why not make it an even 150 or at least 140. I think it is because things are converted from Fahrenheit . I am only new to using the kiln but I think that 139 and 150 are both slow ramp rates. The original soft fuse has all sorts of odd numbers. The cooling step is 111 to 427. I think I can play with this to make it all nice round numbers.

Val


Saturday, August 17, 2013

Working on methods

As well as experimenting with different fusing programs. I keep finding patterns I want to make that take a bit of thinking.


I really wanted to make some cotton reels but I couldn't work out a way to get the angles right for the spool and the background. I was playing around with another design when it struck me that I could draw a template with cutting lines, cut out 2 squares into the same shapes then mix and match them. Just like the stack and slash method for quilt blocks.

Here are some templates for cutting. The cardboard pieces are to trace around in my design book so I can make designs the right size. The one on the right is for the cotton reel.


The one on the left is for the wonky 9 patch. I made two in pink and purple. Nothing is fired yet. I need to make up enough pieces to fill the kiln.


We really wanted to make some transparent earrings and use plastic posts but when we put the posts on and tried to put the backs on they were pretty wobbly and the back nuts were difficult to get on. They have all gone in the give away pile. We won't be buying any more plastic earring backs or making transparent earrings. A shame, because they do look pretty.

I spent several days working on the card design to mount the earrings and pendants. It looks great and we have attached lots of earrings and some pendants and buttons. We have a business meeting most mornings at breakfast and I record all our ideas using the Inspiration app. I like using boxes and arrows rather than a simple list.

Here are some of the pendants ready to go.


Cheers,
Val


Sunday, August 11, 2013

Some tack fusing and new pendants

We are still trying out lots of things. Trouble is it takes a day and a night to see and touch the result. It is like we are moving in slow motion. I have tried some more complex patterns and trialled some tack fusing at 735 for 10 mins hold. It gives a smooth but crisp look.

Here are some bits and pieces waiting for the kiln. I got the idea for the dragonfly from Pinterest.


Here are some of the pendants I have been making.


I have been searching with lots of different search words to try to find quilt related pendants or jewellery. There is some mosaic sort of patchwork out there but nothing complex. I also found a gift shop in the US that sells several different simple block patterns but they look like he used his scrap glass to make them. They didn't seem very colourful.

We hope to buy the shopping cart software beginning of September and have our shop operating by middle of September. The website will be glassapplique.com
It is all such fun :)

Cheers,
Val